Tuesday, March 30, 2010

Scrawny, Purple Tomato Seedlings

I'm on my third year of growing tomatoes from seed. The last two years everything went well and I grew strong, healthy beautiful tomato plants in peat pellets. This year, I read a lot of negative commentary about peat pellets and some great commentary about a particular kind of seed starting mix, so I thought that I would try this mix. I thought that I might get even better plants.  

Well, I should have left well enough alone. The tomato seedlings that I planted in the seed starting mix are puny and have a purple hue, while the seedling started in the left over peat pellets are thriving.

Look at the difference between tomatoes growing in the two different planting media.  The tomatoes on the left were started two weeks before the ones on the right in the seed starting mix while the plants on the right were started in peat pellets.

Close up of a seed mix seedling

A close up of the peat pot seedling

Last week, I added a small amount of organic Plant-Tone (a 5-3-3 balance) to the sickly looking seedlings. I figured that they probably had some sort of nutritional deficiency.  It doesn't seem to be making a difference, so I asked my neighbor (a landscape designer) what I should do.  She told me that the plants probably need phosphorus.  She only has synthetic fertilizers.  Does anyone out in the blogosphere have any suggestions for a good organic source of phosphorus?  I could try bone meal, but it is so slow acting.  Is there another source of organic phosphorus that is faster acting?  Is it worth trying to save these seedings, or should I just start some more plants from seed in the peat pellets?

I think that next year, I will go back to what has worked well for me in the past....

Monday, March 29, 2010

Edging the Beds

Today, I spent some time edging my flower beds after work. I needed to edge them to keep the grass from taking over the beds and give the beds sharper definition. I edge the beds every year before I mulch them, so that the trenches will hold the mulch back from spilling into the yard.  I'm not a big fan of artificial or stone borders.  I like a nice, clean edge.

I had grass encroaching on my plants.  It was a 'joy' to reach into my rose bush and pull out the stray grass.  Thank goodness for garden gloves.

I also had grass growing into my beds.

Here's the trench that I made.

First, I make a trench along the edge of the bed.  I usually do this with a hand trowel. This year, I did it with my large spade, because I want some extra dirt to put into the raised beds that I am going to build in the hidden garden at the end of the alley. After I made the trenches, I patted the sides smooth to pack in the loose dirt clumps.  

Here's all the dirt that I collected for the raised beds.

After chopping the leaves, I spread them over the beds making sure to give the perennials a little leaf free space around their crown.  I also pressed the leaves into the trenches to give the edges a finished look.  The lawn still has some finely chopped leaves left and I raked them in as best as I could.  In a couple of weeks, the microherd of bacteria will have broken the chopped leaves down so that I can't see them.  These leaves will serve as fertilizer for the lawn.  If you want to know more about using leaves for compost for your lawn, here's a link to an excellent article about it in Fine Gardening.

Leaves and composted horse bedding have been staples as mulch and fertilizer in my flower beds for years.  This year, I am going to try them on my lawn.  When I moved into my house 5 1/2 years ago, I had terrible clay soil.  Now I have beautiful soil because of the chopped leaves and compost.  I hope that they will perform the same kind of magic for my lawn.  The best part of using leaves as fertilizer and compost is that they are free!

During this whole process, I had to chop the leaves to use as mulch.  I made a mistake last fall.  Usually, I chop up the leaves that fall from my oak tree and spread them over the beds.  This year, I waited too long and I was lucky to get the leaves onto the bed at all.  I didn't get around to chopping them up with the mower.  I just ran over the leaves in the grass once with the mower to pick them up off the grass and I spread them over the top of the whole leaves that had fallen on the garden.  I usually follow this step up by running over the beds with the mulcher function on the mower.  However, I didn't do it last fall.


Today, I raked the leaves out of the beds and ran over them a few times with the mulcher mower.  Then I ran over them again to pick them up so that I could spread them on the beds.  This option was not ideal.     During the raking, I damaged some of the smaller plants.  The chopped up leaves aren't as fine as they would have been had I done all this in the fall.  By spring, the chopped up leaves have really started to break down.  Overwintering whole, the leaves broke down some, but they are not as attractive as they would have been had the chopped up leaves gotten exposed to winter weather.  This fall, I will start earlier.

Wednesday, March 24, 2010

The Blueberry Experiment

I LOVE blueberries.  It just don't love how much fresh berries cost in the grocery store.  Since I live in Central Indiana where the soil is rather alkaline, blueberries won't grow well in the ground here.  Last year, I researched how to grow them in containers so that I could better control the PH of their planting medium.  Colorado State University did a study of the best planting medium in which to grow blueberries in containers.   They found that a mixture of 40% coir, 40% peat, and 20% perlite resulted in the highest blueberry yields from blueberries grown in containers.  Coir is coconut fiber that can be purchased in quantity at hydroponic stores.


Last spring, I planted 5 plants of three different blueberry varieties in the recommended planting mixture: Elliot, Northland, and Coville.  Blueberries produce the most fruit when different cultivars are planted together because their fruit production benefits from cross pollination.  I planted the bushes in 24" pots which should give their roots the room that they will need.

All of the bushed survived the winter unprotected in my backyard.  They all have buds.  Only one of them suffered winter damage and has several dead branches.  Even that one has an adequate number of branches with buds.

Tuesday, March 23, 2010

Rolling in Compost

Compost makes me deliriously happy!  I get to pile a bunch of my house and yard trash together, and in a year or so, I have black luscious, nutritious compost for my garden.  A lot of people fuss over their compost, worried about getting the right mix of nitrogen and carbon, but they are really making too big of a deal out of the whole process.  After all, no matter what a person does with a compost pile, organic matter will always decompose.  I am a lazy, thoughtless composter, and I get wonderful results.

The basics of making compost are simple.  You need green (nitrogen rich) and brown (carbon rich) stuff to add to your pile.  Piles also need air and moisture, but not too much moisture.   Picky compost people try to balance browns and greens with a 3 to 1 ratio.  I'm not that picky.  However, if my compost starts to stink, I add some more browns (like leaves and/or shredded paper) so that it won't stink. Stinky compost means that you have too many greens and not enough browns.

[Today's kitchen scraps]

[Since it is March, perhaps I should toss my Charlie Brown poinsettia into the pile.] 

For green stuff, I add fresh plant-based materials from my kitchen and yard to my pile.  Green stuff generates heat for the pile. These materials include vegetable and fruit scraps, old baked goods, coffee grounds, tea leaves, manures from plant eating animals like horses, weeds (no seed heads or roots from invasive plants), grass clippings, green leaves, and in my case, neglected and otherwise past their prime plants. 


For brown stuff, I add shredded junk mail and paper, leaves, cornstalks, hay, and sawdust.  Be careful with paper.  Anything cheap is usually fine to use because it's either made with soy or clay based inks.  I don't add fancy, glossy printed paper to my compost because there's a strong possibility that the inks contain heavy metals or petroleum derivatives.  I also shred paper because when I haven't, I've gotten clumps of unfinished paper in my compost.  The shredding also makes the compost lighter so that more air can penetrate the pile. Since I tend to have a lot of greens in the summer because of yard waste, I typically keep a couple of bags of leaves from the fall to add to my pile if it starts to smell bad.

I would avoid composting animal products, sticks and branches, fats/oils, diseased plants, invasive plants/roots, seedy weeds, and/or manure from animals that consume meat.

Some people use compost starters, but this really isn't necessary. Organic materials will decompose well with or without the starter.


I compost using a three bin system: one bin for adding materials, one for decomposing, and a finished bin for using.  My first bin was made from chicken wire, but I didn't like it.  The compost was difficult to get out of the chicken wire because the finished compost would spill a little through the sides at the bottom and get roots tangles through the wire, making the bin difficult to remove from around the compost.  I bought some plastic-coated wire bins that I like.  I hold the sides together with plastic-coated garden wire that is easy to remove, thereby making the bins easy to disassemble when I need to empty the bin.  

I have an old coldframe top with deer fencing stapled to it on top of the compost bin because of my dogs.  They view the compost bins as a personal snack bar.  Once they eat their half-rotten 'snacks', they come in the house and throw up.  The stapled fencing and coldframe worked for a while, until one of them figured out that he could stand on the fencing and use his weight to break through the fencing to get to the 'goodies.'  That's why there's a chair on top of the bin.  One of my projects this summer is to create a better lid for my compost pile.


After a half year or so, all of this garbage becomes


half finished compost that I may or may not turn. Some people actively manage their piles, turning the piles every couple of weeks. Turning the pile provides the piles with more oxygen and redistributes the greens which in turn causes the piles to decompose faster. The beauty of compost is that it will still decompose if you do nothing.  It will just take longer without the turning.  I'm in no hurry, and I'm not a picky composter, so I usually just throw my stuff into the pile and ignore it until


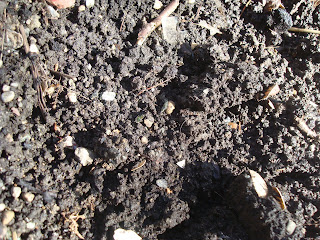
it looks like this photo.  This compost is finished and ready to use in my garden.  In fact, today, I moved a large portion of it to the lot at the end of my alley so that I can use it in the raised beds that I'm going to build this spring.  The miracle is that this pile was a bunch of junk mail, newspapers, phone book pages, yard waste, and kitchen scraps a year ago.  Now it's this beautiful, nutrient-rich compost full of worms.

Between composting and recycling, I typically only throw one kitchen-sized bag of garbage away a week.


Monday, March 22, 2010

Lettuce Thinning

When I set up my light for seed growing, I decide to start some lettuces inside so that I could get some a little earlier.  No matter how careful I am, I typically sow the seeds too heavily.  I really needed to thin out the lettuce.  The weather has been great for the past couple of weeks, with highs in the 50s and 60s, and the 10 day forecast suggests that the weather will remain fairly warm.  Since I had nothing to lose, I decided to take the lettuces that I thinned and transplant them to some outdoor pots.


I mixed up some nice planting mixture from some chopped up leaves, compost, and the remains of last year's annuals pots.


Then I place the mixture into some pots that I have.  I made holes with my finger in the soil mixture and place individual seedlings that I culled from my lettuce starts into the holes.


Finally, I watered the seedling with a little water in which I had soaked some willow branches.  The willow tea promotes root growth.

J6M8CKBW4XCJ

Sunday, March 21, 2010

I Didn't Kill My Rosemary!


I have a tough time overwintering my rosemary.  Every year, I kill it sometime in February.  It either dries out or gets this white powdery stuff and turns brown.  This year, I had a beautiful plant and I really wanted it to last through the winter, so I did a lot of reading of many different sources on how to help it survive the winter.  Maybe it was just a fluke that it didn't die, but here are the things that I tried:

  1. I watered the rosemary a couple of times with water in which I had soaked some willow branches.  This willow water is supposed to boost the defense system of plants.
  2. I put the rosemary in a clay pot at the beginning of the summer so that I could move it indoors without disturbing the plant's roots.  It didn't have to go through any transplant shock.  The clay pot was used to guard against overwatering.  Rosemary doesn't like to stand in too much moisture.
  3. I watered regularly.  In the past, I didn't water much because rosemary can be sensitive to too much water.  I think that I under-watered and dehydrated the plant.  The clay pot allowed me to water more frequently without having to worry so much about overwatering.  
I wasn't able to put the plant in full sun.  I don't have any full sun windows in my house.  In fact, I overwintered the plant in a north facing window.  I can tell that the lack of light has impacted the plant.  The new growth is spindly looking and soft.  However, this new growth has been fine for cooking.  I'l be able to start reintroducing the plant to the outdoors over the next couple of weeks.  I'll start it off in a shady, protected spot and eventually move it into full sun in a less protected location.

Saturday, March 20, 2010

Saving Tomato Seeds

My friend, Matt, is so smart.  He just gave me some tomato seeds that he saved in a unique way:


He just scooped tomato seeds onto labelled index cards, guts and all.  Then he let them dry.  When it's time to plant them, you just need to flick the seeds off the card.  He was careful with the seed cards.  He stored them in a paper envelope.  I was a little more careless because I transported them to my house loose in my purse.  I lost a couple of cherry tomato seeds, but not many.

Too bad I didn't have more varieties which seeds fell off in my purse.  I would have played the tomato mystery game by planting the seeds and trying to guess which tomatoes would come from which plants.  This is similar to the game that I play in the spring with the volunteer tomatoes in my garden.

We had a strange coincidence last year.  When it came time to trade seeds, we ended up having  8 of 10 of the same heirloom varieties.  We didn't plan our seed buying in advance and we bought from different sources.  This year, we only have a couple of varieties in common.

Friday, March 19, 2010

Preparing Potatoes for Planting


This year I am going to grow five different kinds of potatoes in addition to the potatoes that I've started from last year's leftovers.  I purchased certified seed potatoes that are red gold, all blue, carola, banana fingerling, and German butterball.  I chose these varieties based on taste and appearance.  I should have given more thought at the time I ordered to when they would mature.  All of the potatoes except for the all blue are late maturing varieties.  Oh, well.  Live and learn.  Next year, I'll add an early maturing variety and get rid of whichever variety is my least favorite.

The seed potatoes all had several eyes, so I needed to cut any potato that was larger than a golf ball into smaller pieces before planting.  Each piece needed to have at least a couple of eyes.


After I cut the potatoes into smaller pieces, I set them on newspaper to dry overnight.  They needed to form a callus over the cut area so that they would be less likely to rot once planted.

Here are the potatoes two days later with calluses.  

Thursday, March 18, 2010

Planting Shallots and Onions

I'm so excited.  I'm going to try growing onions and shallots for the first time.  I bought some gray shallots from Territorial Seed Company and red onion sets from a big box store.

From what I've read, the gray shallots are really easy to grow.  I love to cook with them, but they're not cheap in the grocery.  I'll be so excited if I can successfully grow them myself.

I'm a little worried about the shallots.  They should have been planted in the fall, but I ran out of time before the ground froze.  They are fairly dried out, but I cut a small one and a large one open and there was some hydrated/tender center in them.

I started by digging a trench that was about 1 1/2" deep because shallots should be planted so that the top of their necks stick out a little bit from the surface of the soil.  They should also be planted about 8" apart.  I marked 8' on the handle of my Japanese hoe so that I would space the shallots appropriately.   Once I placed the shallots in the trench, I covered them up with soil.


The onions are a lot fresher, so I'm not so worried about them.  


I planted them the same way that I planted the shallots, only the trenches were 1" deep and I planted them 5" apart.

Wednesday, March 17, 2010

Planting Sugar Snap Peas

Since Daylight Savings Time began, I have a good amount of time after work in which I can garden.  After work today, I really got a lot accomplished.  I planted sugar snap peas, onions, and shallots.  I also got some weeding accomplished in the process.


I mixed my sugar snap pea into my perennial bed along the fence and I also planted some in the hidden garden at the end of the alley.  I have invested a lot of energy (lasagna garden with an annual mulching of chopped up leaves and composted horse bedding) in creating some terrific soil in my perennial bed, so planting was easy:

First, I made a hole with my finger.  Peas need to be planted about 1" deep.  The distance between the tip of my finger and my first knuckle is about 1", so making a hole at the correct depth with my finger is easy.

Then I dropped a pea in the hole and covered it up.

In my perennial bed, the peas will climb the fence. In the hidden garden, they will climb some tree branches that I scavenged from the lot.


Tuesday, March 16, 2010

Everything's Going to Be Great


Every year as soon as the snow thaws, I start my daily search for crocus.  When I kind them poking through the soil and when I find them blooming, I know that everything is going to be great.  Spring is coming and I can start working out in my garden.

Monday, March 15, 2010

March Garden Calendar

In my efforts to become more organized, I am creating a month by month to-do list for my garden.  So far this month, I have planted most of my seeds that can be started indoors, pruned my shrubs, and started some of my potatoes outside.

My very basic garden calendar


This year's seeds


Flats of seeds that will go on my light shelves


This first half of the month, I still need to remove the mulch from my front yard beds, over-seed the lawn, and edge my garden beds.  The second half of the month, I will direct sow my onions, garlic, shallots, peas, potatoes, and spinach.  Then I will begin installing a watering system for my garden.  

Sunday, March 14, 2010

Growing Potatoes in Containers

Last year, I experimented with growing potatoes in containers.  I have a small garden, so planting them in the ground takes up too much space.  The potatoes were super easy to grow in the containers.    I had some left over potatoes from last year that started to chit (grow sprouts), so I decided to try starting them.  I think that these leftovers are Swedish peanut fingerling potatoes and red gold potatoes.  I worry a little about disease because these potatoes are not certified seed potatoes. However, since they will be in their own containers and in a separate garden from my other potatoes, I decided that it's worth the gamble.  I figure that I have nothing to lose, and quite frankly, I need to be playing around in the garden.

It's a little early to plant potatoes in Indianapolis, but the daytime temperatures are projected to be in the upper 50s for most of the next two weeks.  If we get beastly weather, I can always bring the containers inside and store them in my laundry room temporarily.  I intend to start my certified seed potatoes soon.  Since I actually have some money invested in them, I'm going to be more conservative about when I plant them.  I can hold off for a week or two until I'm sure that the weather will be warm enough to plant them.


The leftover chitted potatoes

I'm going to grow these 'extra' potatoes in the small vacant city lot/hidden garden at the end of the alley near my house.  Last year, my neighbor and I cleaned out all the trash and tree debris, cut down diseased trees, and started a raised bed.  She tested the soil and it's fine.  This year we will add more raised beds to the garden.

The hidden garden at the end of the alley

Here's how I started:

First, I mixed together some soil and compost.


Then I put a shovel full of the mixture into a tree-sized plastic nursery pot with good drainage.  Potatoes benefit from the compost because it conditions the soil and provides some disease resistance.


Next, I added a couple of handfuls of oak and other leaves to the pots to provide a little acidity since we have alkaline soil.  The leaves also help to lighten the soil mixture.  On top of the leaves, I placed 4 potatoes about 5 inches apart.


Then I added another layer of soil/compost mixture on top of the potatoes.

Finally, I added a couple of hands full of leaves on top of the soil mixture.  

Over the spring and summer, I will add compost, leaves, and maybe a little soil on top of the potatoes as the sprouts get to be 4 inches tall. I will add enough 'stuff' to cover an inch of them stem, so that at least 3 inches of potato foliage are exposed above the soil line. I will water regularly when it doesn't rain enough so that the potatoes don't go through dry spells.  About a week after the potatoes bloom, I'll start stealing some new potatoes.  Then I will wait to harvest the full grown potatoes until after the foliage dies back.  All I have to do to harvest the potatoes is to tip the pot over and pick out the spuds.

Friday, March 12, 2010

Cheap and Easy Seed Envelopes

I like to reuse/recycle when I can.  I've been thinking about how I can reuse the numerous seed catalogues that I received this year.  I also have some extra seeds left over form what I bought, collected or was given. Some of my friends and I are going to trade our left over seeds.  I divided up my leftovers into smaller portions and packaged them up using half pages from my seed catalogues and sealing them shut with sticky labels.  The multiple folds should contain even tiny seeds.


Related Posts with Thumbnails